Application Control
This page refers to an older version of the product.View the current version of the online Help.
Web Services ConfigurationIn this section:
•Web Services Port Configuration
•Configure Application Manager Web Services to use SSL
•Configuring TCP port numbers used for Communication
•Configuring the Windows HTTP Subsystem
•Editing the Application Manager Web Services Configuration
Prerequisites
The system requirements for Application Manager Web Services are:
•Microsoft .NET Framework 4.0 Full (x86 and x64)
•Microsoft Visual C++ 2015 x86 Redistributable package. This is required for both x64 and x86 versions of Application Control
For further information on required utilities and components, see the User Workspace ManagerInstall and Configure Guide.
Web Services Port Configuration
The Application Manager Web Service provides two communication routes:
•With machines hosting the Application Control Agent to allow reporting of data.
•With the Application Control Console to allow querying of collected data.
Communication with the Application Manager Web Service is via HTTP or optionally Secure HTTP (HTTPS), defaulting to the standard TCP ports 80 for HTTP and 443 for HTTPS. It is recommended that you use the default values, as these ports are already well known by firewall products and should provide the most trouble-free installation.
However, should you find you have port conflict with other software, follow the steps to configure the Application Manager Web Service to use ports that are free.
Configure Application Manager Web Services to use SSL
This process describes how to configure the Application Manager Web Services to use secure sockets for communication.
-
Click Start > Run and enter MMC.
The Microsoft Management Console displays.
-
Click File > Add/Remove Snap-in...
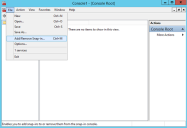
The Add or Remove Snap-ins dialog displays.
- Select Certificates and click Add.
-
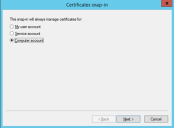
From the Certificates snap-in dialog, select Computer account and click Next.
-
Click Finish and then OK.
The snap-in is added to the MMC.
- From the navigation tree, select Certificates (Local Computer) > Personal.
-
Right-click Personal and select All Tasks > Import...
The Certificate Import Wizard displays.
- Click Next.
-
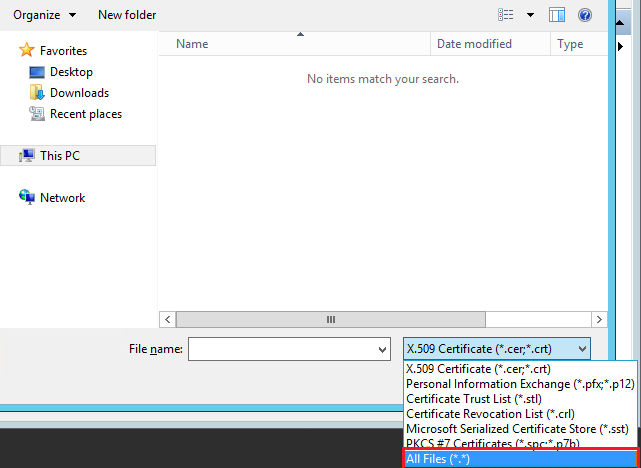
Click Browse and change select All Files in the Open dialog.

- Navigate to, and select, the required PFX file and click Open.
- Click Next.
-
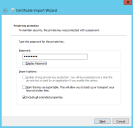
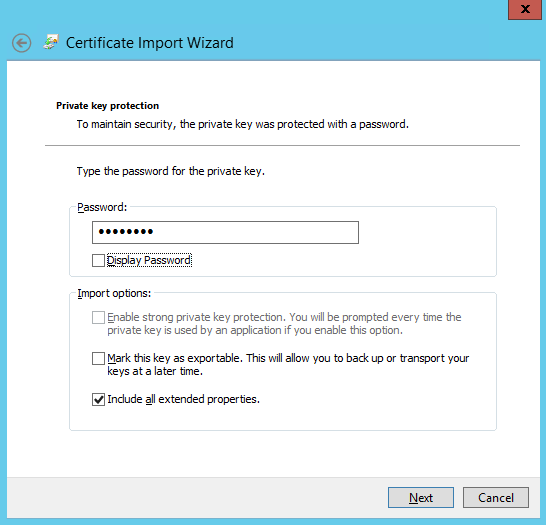
Enter the password for the private key and click Next.
-
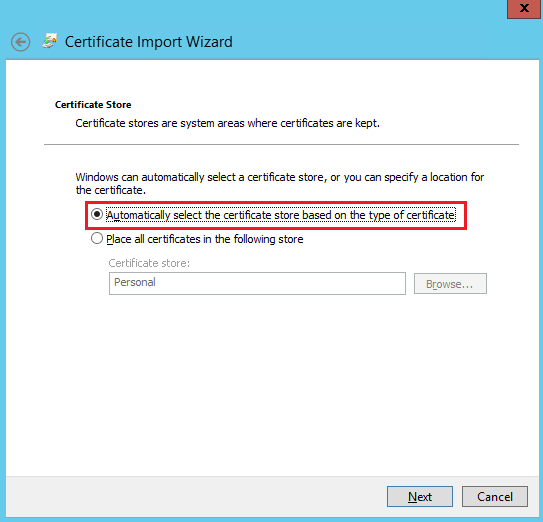
Select Automatically select the certificate store based on the type of certificate option and click Next.

- Click Next then OK to complete the import and close the wizard.
-
Refresh the MMC.
The certificate displays in the Personal > Certificates store.
- Right-click on the machine certificate and select Open.
- Select the Details tab.
-
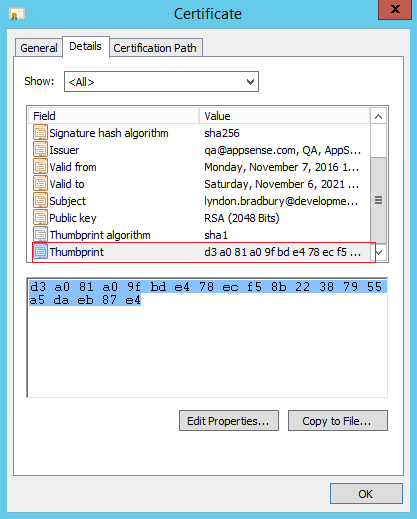
Select Thumbprint to display the value in the text box below.
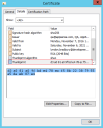
- Copy the value and paste it into a text editor, such as Notepad.
-
Remove any spaces from the value. This will be used for the certhash value in the commands entered in step 26.

- Click OK to close the certificate.
- Close MMC without saving.
- Stop Application Manager Web Services.
- From an elevated Notepad, open the following file:
%ProgramFiles(x86)%\AppSense\ApplicationManager\AnalysisService\AnalysisServiceCore.dll.config - In the file, change
http://localhost:80/ondemandtohttps://localhost:443/ondemandand save. - From an elevated CMD on the server, run the following commands, replacing the certhash values with your thumbprint value from step 20:
netsh http add sslcert hostnameport=localhost:443 certhash=d3a081a09fbde478ecf58b22387955a5daeb87e4 appid={00000000-0000-0000-0000-000000000000} certstorename=mynetsh http add sslcert hostnameport=lb-svr2012-r2-5:443 certhash=d3a081a09fbde478ecf58b22387955a5daeb87e4 appid={00000000-0000-0000-0000-000000000000} certstorename=my
- Start Application Manager Web Services.
-
From a browser, text the connection to the web service using https:
https:// lb-svr2012-r2-5/ondemand -
Authenticate with a valid user.


Configuring TCP port numbers used for Communication
For the two communication routes you can independently configure the ports used for HTTP and HTTPS, meaning up to four different port numbers could be configured.
However, for simplicity it is recommended that if you are changing port configuration that you make the same changes to both communication routes. If you are choosing to change the port used for HTTP, then make the change for HTTP on both routes and similarly if changing the Secure HTTP port.
Any firewalls on the machines participating in communication must allow connections over the configured ports.
Use the following procedure to configure your ports.
-
Open an administrator level Command Prompt and type:
netsh http show urlaclA list of the reserved URLs displays.
-
Verify that the following entries exist:
Reserved URL: https://+:443/AmAnalysisService/
User: NT AUTHORITY\LOCAL SERVICE
Listen: Yes
Delegate: No
SDDL: D:(A;;GX;;;LS)
Reserved URL : https://+:443/AmAnalysisQueryDataService/
User: NT AUTHORITY\LOCAL SERVICE
Listen: Yes
Delegate: No
SDDL: D:(A;;GX;;;LS)
Reserved URL : https://+:443/OnDemand/
User: NT AUTHORITY\LOCAL SERVICE
Listen: Yes
Delegate: No
SDDL: D:(A;;GX;;;LS)
-
Using a text editor, open the AMAnalysisServiceCore.dll.config located in:
C:\Program Files(x86)\AppSense\ApplicationManager\AnalysisService\AMAnalysisServiceCore.dll.config
-
In the text document search for the following statement:
<add key="ON_DEMAND_SERVICE_URI" value="https://localhost:80/OnDemand/"/> -
Replace the statement with following:
<add key="ON_DEMAND_SERVICE_URI" value="https://localhost:443/OnDemand/"/> - Save and close the text document.
- Using Internet Explorer, navigate to https://localhost:443/OnDemand.
The text editor must be elevated to save the document.
Configuring the Windows HTTP Subsystem
The Application Manager Web Service uses the Port Sharing feature of Windows HTTP (HTTP.SYS), allowing it to co-exist with other applications making use of the same mechanism. At a basic level this is achieved by an application registering a portion of a URL, including a port number, for which it will be responsible for servicing requests.
The Application Manager Web Service runs under the account of Local Service, so you need to grant access to the port for that account. You can do this using the httpcfg.exe or netsh.exe tool, depending on the OS Version on which you have installed the Application Manager Web Services:
Running Windows Server 2008, Windows Server 2008 R2, Windows Server 2012, Windows Server 2012 R2, Windows 7, Windows 8, and Windows 8.1
Use the Netsh.exe tool to configure and display the status of various network communications server roles and components.
For further information, see http://technet.microsoft.com/en-us/library/cc754753(WS.10).aspx.
Do the following:
Open an
administrator level Command Prompt and type: netsh
http add urlacl sddl=D:(A;;GX;;;LS) url=<URL>
<URL> is the URL containing the port you
wish to grant access to.
Use the netsh.exe or httcfg.exe tool with the following URLs and commands to configure each of the ports. The examples shown here use the netsh.exe tool but the same command parameters are used with httcfg.exe:
HTTP Port
Enter http://+:<HTTP_PORT>/AmAnalysisService/
The <HTTP_PORT>in this example, is to
represent the port number you have chosen for standard HTTP communication.
For example, to use port 81 enter the command:
netsh http add urlacl sddl=D:(A;;GX;;;LS) url= http://+:81/AmAnalysisService/
Secure HTTP (HTTPS) Port
Enter https://+:<HTTPS_PORT>/AmAnalysisService/
The <HTTPS_PORT> in this example, is
to represent the port number you have chosen for Secure HTTP communication.
For example, to use port 444 enter the command:
netsh http add urlacl sddl=D:(A;;GX;;;LS) url= https://+:444/AmAnalysisService/
Use the netsh.exe or httcfg.exe tool with the following URLs and commands for each of the ports. The examples shown here use the netsh.exe tool but the same command parameters are used with httcfg.exe:
HTTP Port
Enter http://+:<HTTP_PORT>/ AmAnalysisQueryDataService/
The <HTTP_PORT> in this example, is
to represent the port number you have chosen for standard HTTP communication.
For example, to use Port 81 enter the command:
netsh http add urlacl sddl=D:(A;;GX;;;LS) url= http://+:81/AmAnalysisQueryDataService/
Secure HTTP (HTTPS) Port
Enter https://+:<HTTPS_PORT>/ AmAnalysisQueryDataService/
The <HTTPS_PORT> in this example, is
to represent the port number you have chosen for Secure HTTP communication
For example, to use Port 444 enter the command:
netsh http add urlacl sddl=D:(A;;GX;;;LS) url= https://+:444/AmAnalysisQueryDataService/
Editing the Application Manager Web Services Configuration
Editing the Application Manager Web Service configuration requires manual editing of its XML configuration file - AMAnalysisServiceCore.dll.config - located in the directory where the Application Manager Web Services are installed.
Default Installation Directories:
- 32Bit OS - C:\Program Files\AppSense\Application Manager\AM Web Services
- 64Bit OS - C:\Program Files (x86)\AppSense\Application Manager\AM Web Services
Caution: Before starting it is highly recommended that you take a backup copy of this file because an incorrect configuration can prevent the Application Manager Web Services from starting.
In the process below, <HTTP_PORT> is the port number you have chosen for standard HTTP communication.
- Using the Windows Services Administrative tool, stop the Application Manager Web Service.
- Open the AMAnalysisServiceCore.dll.config
file in a text editor such as Notepad and navigate to the
<services>XML tag. - If required, do the
following:
- To reconfigure the Agent to Service communication, go to Step 4.
- To reconfigure the Console to Service communication, go to step 9.
-
To change the HTTP Port, navigate to the following the XML tag:
<service name="AmAnalysisServiceCore.AmAnalysisWebService"> -
Select the
webHttpNonSecureBindingattribute and replace the address value using the following format:address="http://localhost:<HTTP_PORT>/AmAnalysisService -
To change the Secure HTTP Port, navigate to the following XML tag:
<service name="AmAnalysisServiceCore.AmAnalysisWebService"> -
Select the
webHttpSecureBindingattribute and replace the address value using the following format:address="http://localhost:<HTTPS_PORT>/AmAnalysisService -
To change the HTTP Port, navigate to the following the XML tag:
<service name="AmAnalysisServiceCore.AmQueryDataWebService"> -
Select the
wsHttpNonSecureBindingattribute and replace the address value using the following format:address="http://localhost:<HTTP_PORT>/AmAnalysisQueryDataService -
To change the Secure HTTP Port, navigate to the following XML tag:
<service name="AmAnalysisServiceCore.AmQueryDataWebService"> -
Select the
wsHttpSecureBindingattribute and replace the address value using the following format:address="http://localhost:<HTTP_PORT>/AmAnalysisQueryDataService -
Save and close the AMAnalysisServiceCore.dll.config file.
The text editor must be elevated to save the document.
-
Using a text editor, open the AMAnalysisServiceCore.dll.config located in:
C:\Program Files(x86)\AppSense\ApplicationManager\AnalysisService\AMAnalysisServiceCore.dll.config -
In the text document search for the following statement:
<add key="ON_DEMAND_SERVICE_URI" value="http://localhost:80/OnDemand/"/> -
Replace the statement with the following:
<add key="ON_DEMAND_SERVICE_URI" value="http://localhost:443/OnDemand/"/> - Save and close the text document.
-
Using the Windows Services Administrative tool, start the Application Manager Web Service.
If there are any problems starting the Service, refer to the Windows Event Log under AppSense for error data.
Related topics
This page refers to an older version of the product.View the current version of the online Help.
The topic was:
Inaccurate
Incomplete
Not what I expected
Other
Copyright © 2019, Ivanti. All rights reserved.